
Time required to complete: < 10 min
Category: Photo manipulation
Hello and welcome to another Photoshop Tutorial.
Today we will learn how to create a demon eye inside Photoshop. I've experimented with some different eye images to see which technique works best for creating some cool dark-art eyes and came I up with this. So let's get started.
In order to complete this tutorial you will need to download the pack below which contains our Eye image, Ground Texture and the displacement map for the eye. If you want you can use your own, but make sure you know how to create a displacement map.
DOWNLOAD HERE
Step 1: Open the Eye.jpg inside Photoshop:

Step 2: Press CTRL+J with the Background layer selected to duplicate it.
Inside the duplicated layer select the Dodge Tool (shortcut O). Change the Range to Midtones and the Exposure to 50% and start painting about 2 times inside the eye until you achieve something similar to the image below:

Step 3: Create a New Layer, fill it with Black and create a Mask for this layer. Also fill the mask with Black.
Now select a soft brush, use White and paint in the mask layer (inside the eye). This should reveal the black from our Layer.
NOTE: Make sure you don't paint across the eye's reflection. This is really important because without it the eye looks really flat. If you are using a different image and the reflections are slightly darker you should use a white soft brush to compensate the highlights, you can also try to change the opacity if the eye turns out over-exposed.

Step 4: Create a New Layer. Select a soft brush (size about 150px for this image) and click once inside the eye about where the iris is:

Step 5: Lower this layer's opacity to about 20%. This will give some transparency to the eye.

Step 6: Add a Curves Adjustment Layer on top of all the other layers:

Step 7: These are the settings I've used but the values are not fixed so make sure you play with the Curves until you achieve something you like. If you want to achieve results like mine lower the RGB to make the image look darker and decrease some of the Reds and increase the Greens a bit.

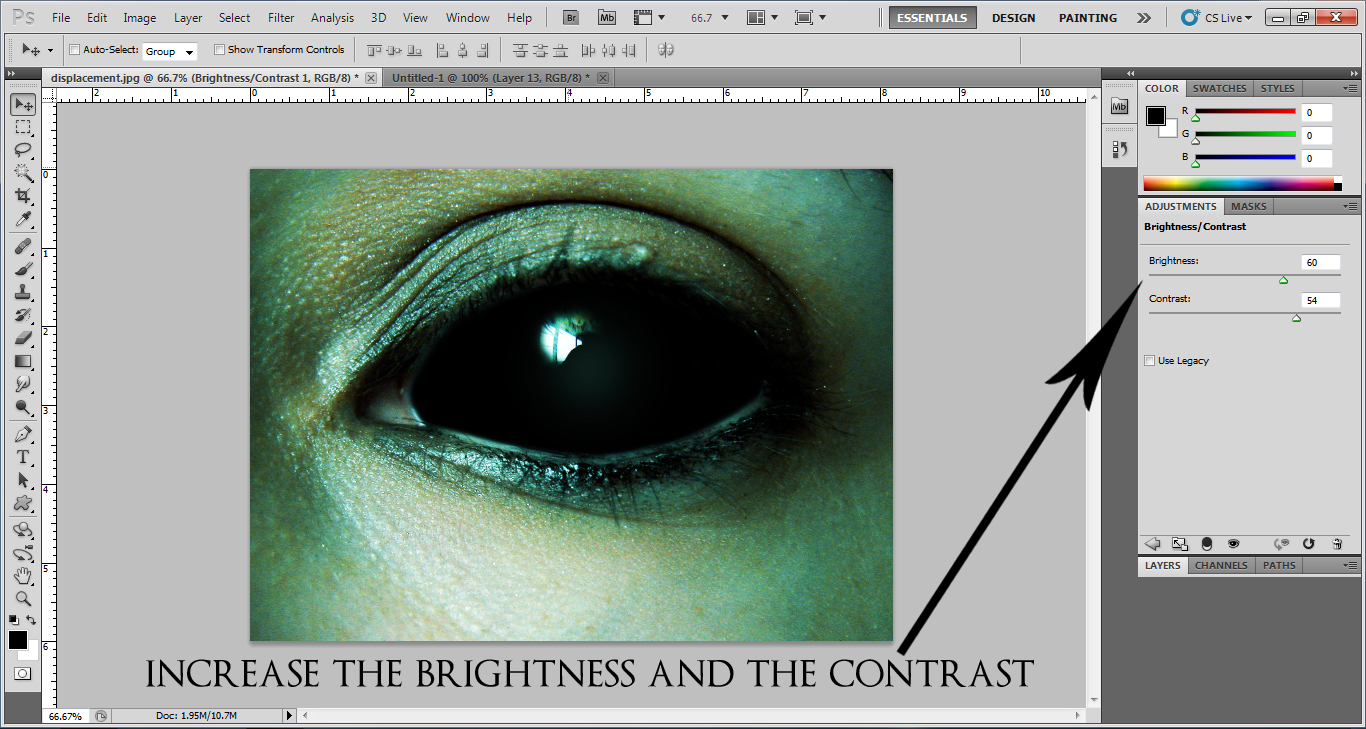
Step 8: Add a Brightness / Contrast Adjustment Layer on top of the Curves layer:

Step 9: Increase the Brightness / Contrast values to about 50-60. These settings will make our photo look sharper and slightly brighter:
Step 10: Add a Vibrance Adjustment Layer on top:

Step 11: Decrease the Vibrance value to about -25. This will make the skin look more pale.

Step 12: Open the Texture layer in Photoshop (Ground Texture.jpg) and place it on top of the other layers. Change its blending mode to Overlay and add a mask to the layer. Inside the mask with a Black soft brush paint across the eye and the eyelids.

Step 13: Now we need to add the Displacement. To do that select the Texture layer (not the mask!) and go to Filter > Distort > Displace.

Step 14: Use a value of 5 for the Horizontal & Vertical Scale and then Hit OK. After you hit OK you will be asked to browse for the displacement map. Use the displacement.psd that you downloaded at the beginning of this tutorial. This will wrap the texture layer across the face.

Here is the final result:

Hope you learned something from my tutorial. To keep in touch with the latest tutorials that i post make sure to like my Blog's Facebook Page: http://www.facebook.com/VenomX3D
For any question about this tutorial please use the comment section below.
See you next time with another tutorial !